|
|
|
||
|
|
Whats New?
TechnicalBiopod ReaderJamma projects FunArcade ControlsPinball OtherWebcamFile downloads Contact Updates by RSS by RSS
 by Email by Email
|
Biopod fingerprint reader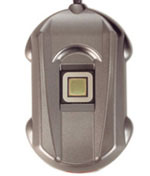 The APC Biopod
The Biopod is a biometric finger-print reader made by APC. It uses an Authentec AES3400 sensor which is often used in
commercially available finger-print readers, including those found built into the chassis of many modern laptops. The image format
The software saves the captured print in PNM format (Portable Any Map). Any good graphics package (such as
The Gimp) should be able to read them, as well standalone convertors like
pnmtopng should you wish to rasterise them.  Output from aes3400.c
The lesser know PNM format was used for a couple of reasons: it's an uncompressed ASCII based image format, which is
incredibly easy to work with. The layout of the PNM format is outlined below: P2 128 128 16 6 1 2 2 13 10 8 1 11 3 6 10 2 1 0 15 7 . . . .
The first line specifies the type of PNM - in this case greyscale and ACSII encoded. Decoding the received data
Device initialisationThe device must be initilised before an image can be captured. This is done by sending several bytes to the device which specifies the gain of the capture, amongst other things. Downloads
The program is written in C, and makes use of the libusb library. You will need to build with this in mind. gcc aes3400cap.c -o aes3400cap -lusb Files aes3400cap.c Comments... I Giron, 15/10/08 @ 20:29 GMT:
Hi! I found the problem to be user permissions' related. When I run it as root (i.e. sudo ./aes3400cap) it works. Now I'll work in the authentication part. Thanks a lot! Florian, 22/10/10 @ 18:46 GMT:
Hello, I have a question about biopod-driver. Do know if it is compatible to aes2810? is it posible to write a driver for that device, because many peoble own a notebook containing such reader. thanks in advantage strobey, 23/10/10 @ 10:16 GMT:
Florian, I'm not aware of any such driver. The code I've supplied isn't really a driver in itself, rather a demonstration of how the AES3400 sensor returns it's data over USB. There was a project going a while ago which attempted to interface these devices with the SANE backend, but I beleive this is long since abandoned. The AES2810 I beleive is a "swipe" style reader, which is similar to the older AES2501 device. With that in mind, perhaps this site will help: http://gkall.hobby.nl/authentec.html Also, more driver-related, are these sites: http://www.thinkwiki.org/wiki/How_to_enable_the_fingerprint_reader http://home.gna.org/aes2501/index_en.html Good luck, and thanks for the response. |
|
|
|
(c) tp 2005-06 | XHTML 1.0 compliant
|
||
Authentec AES3400 found at 002
ERROR: usb_set_configuration (code:1)
What does this mean? Where should I look for a clue?
I'm running Debian Linux etch with precompiled kernel 2.6.18-1-openvz